Hello! I did this on stream sunday (FehInProgress on Picarto) and then promissed a proper tutorial, I hope this was usefull, feel free to send me an ask if you have any questions!
It is a very simple tecnique that can bring a lot of details to your piece!
I want to do more tutorials, so if there is anything that I do that you would like to know the process, or just anything in general, please let me know!
So I feel like a lot of confusion with drawing in perspective is because people are not taught the absolute basics properly? So let’s do that.
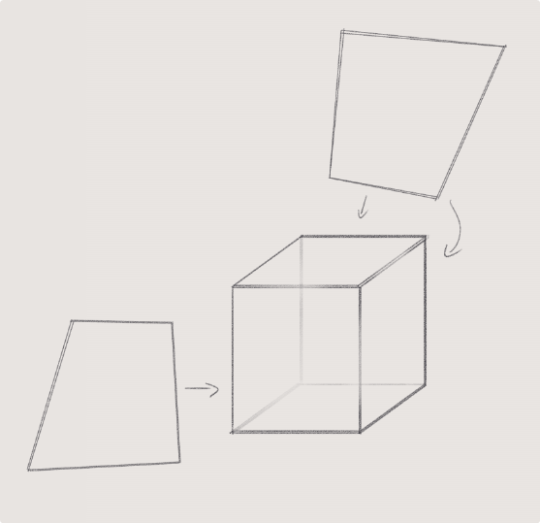
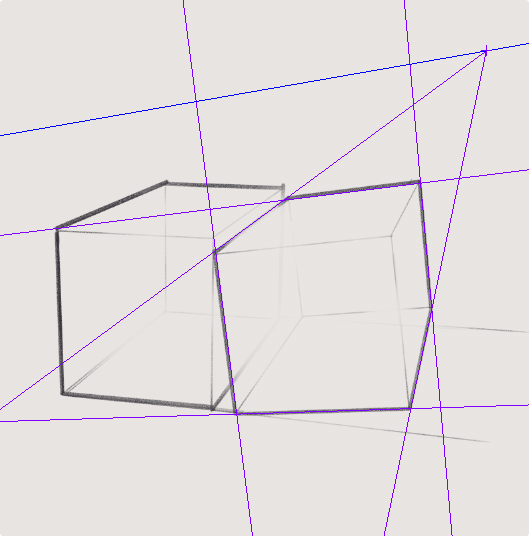
Let’s say we have a cube.
Now, a cube we know is made out of 6 squares or rectangles, and every edge is at a 90 degree angle.
so every opposite edge of a cube is exactly parallel, right?
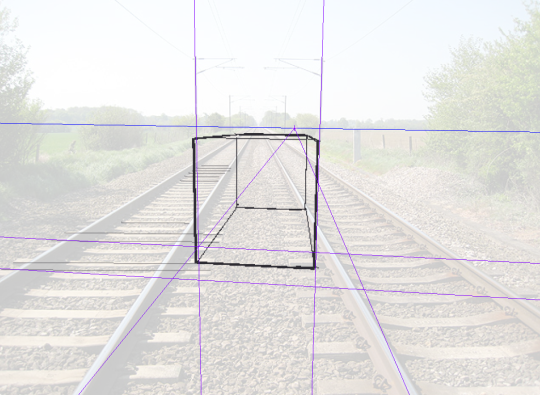
but let’s say we draw a cube using only parallel lines:
this looks a little weird, you know? Like if i try think of this as an object in 3d space and i look at it for too long, the faces start to look really warped – with like the back looking bigger than the front as if its been made out of weird wonky trapeziums
so what’s going on here? if all those edges are exactly parallel, why does it look weird?
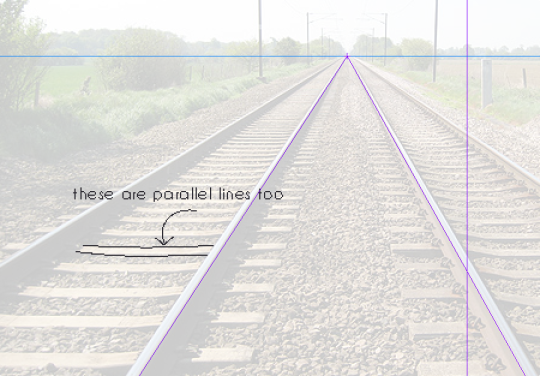
Now we know that the rails on a track are always going to be parallel, they have to be the same distance apart so the train can stay on the track yeah?
But we can very clearly see that these tracks are converging to a single point in the photo.
So what does this tell us, exactly? That our view of the world is naturally warped, and that lines that are physically parallel when drawn in perspective will converge to a single point.
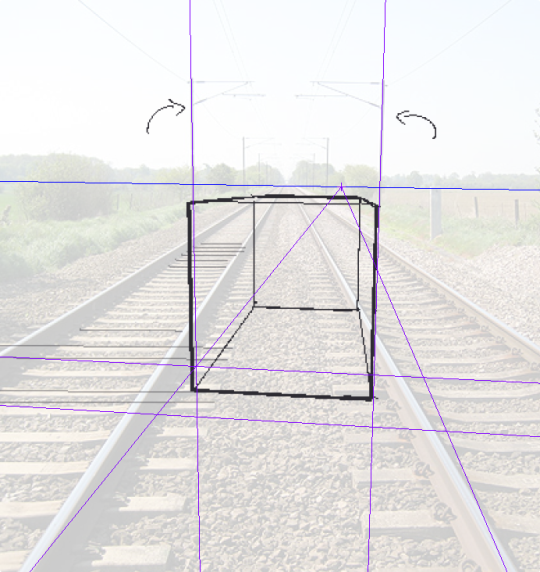
Now, I could call this image “one point perspective” – but that’s not really true,
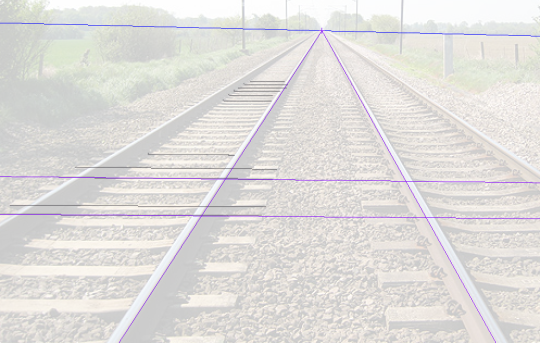
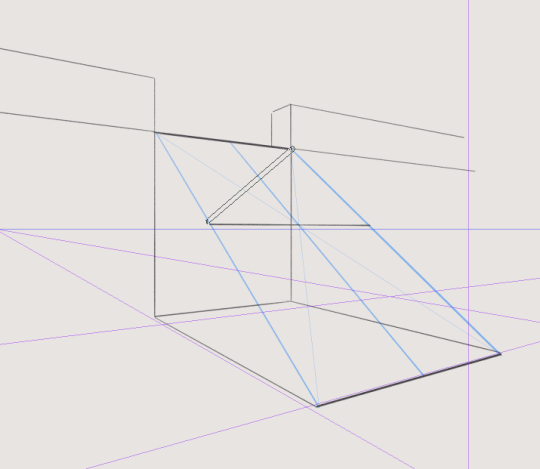
if these lines are also parallel, then they must also converge to a single point in perspective, right? so lets add another point
clip studio paint automatically adjusts the horizon line to fit the new points you add to your perspective…. notice how the horizon line actually fits the photo better now?
our new point is a very very long way away, so we don’t notice a lot of difference in the angle between lines, but the point that i’m trying to make here is:
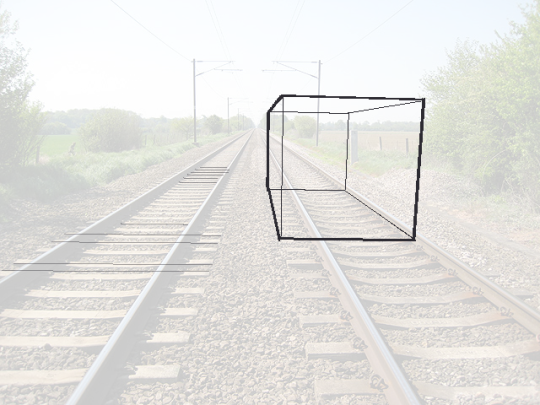
Drawing with perspective guides is not about choosing one, two, three point perspective etc. those are just quick ways to set up a certain viewing angle
What you are doing when you use these guides is making your parallel lines converge to a point.
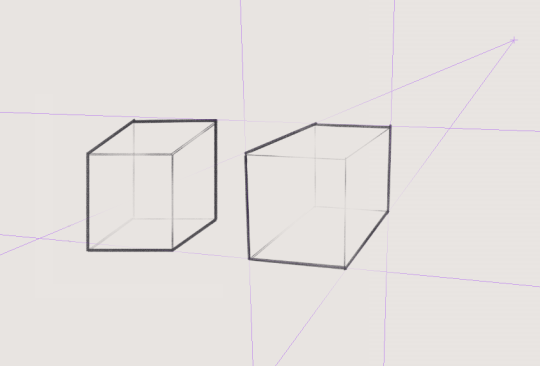
So, if you want to draw a big ol’ cube that’s aligned to be parallel with these railroad tracks, then you can do that with the same point as the tracks – because it’s parallel. It’s on the same axis!
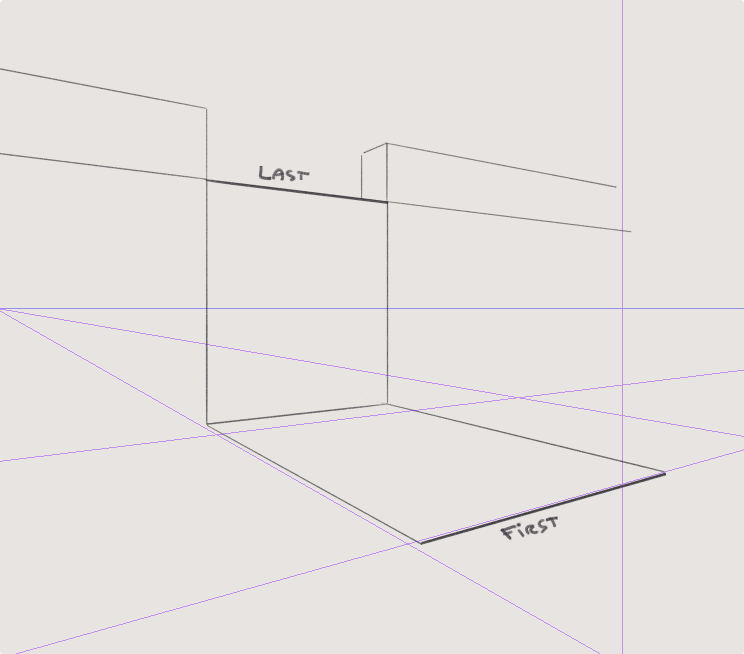
but what if you want to draw a cube that’s rotated, and isn’t parallel to the tracks?
well that’s not too difficult to do if you know that every point represents one set of parallel lines.
If these lines aren’t parallel to the ones you already have, then clearly you just need new points.
We’re not planning to tilt this cube up into the air, or rotate it onto its side, so we’re going to leave the vertical axis alone, and just move our horizontal points to a different place on the horizon line
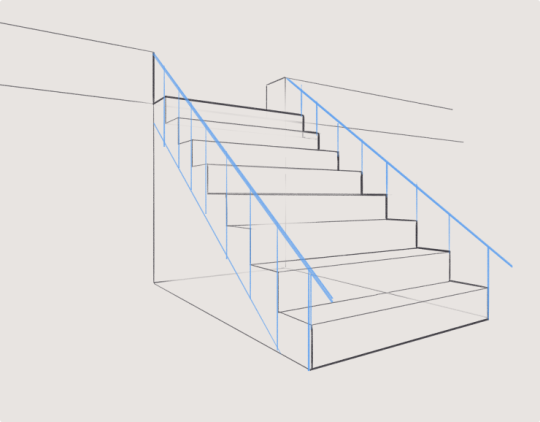
But speaking of the vertical axis – the only points that will be on your horizon line are the ones that are flat on the ground. But you can still have points that are not on the horizon line!
This is important to remember because if you’re trying to draw something like a slope or stairs, something that has an incline, it’s not going to be level with your horizon.
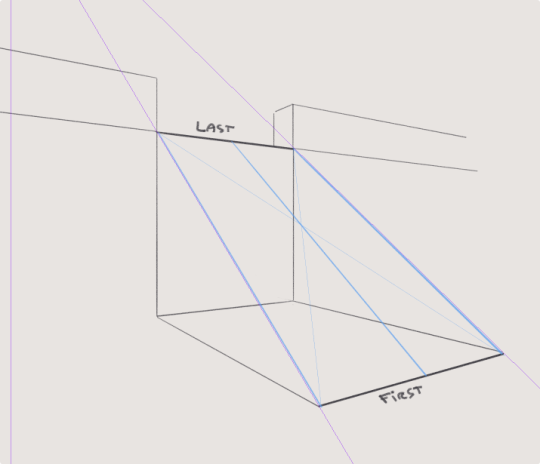
Let’s draw some stairs as an example.
This is actually pretty simple – first draw where your slope starts and ends by drawing a big L shape.
this will give you some parallel corners, which you can then connect to make a new point for your slope
I know poppin’ to be roughly 5 feet tall. I also know that, on average, the height of a room is at least 8 foot tall.
I also know that the pokémon centre has two levels to its base floor room, so I’m thinking it’s a bigger room than average but still a little less than two storeys tall. I decide to make it 12 feet tall, thats one and a half rooms. Considering the average size of pokemon is like, huge, it sounds about right to me.
So I measure that out:
then I add another floor on top, and that gives me the height of the building!
this is the same as measuring out the cubes, I just applied a number this time! the pokémon centre is about four poppin’s tall, or four cubes if you will
there’s all kinds of things you can do by using just a few lines to measure things out. I wanted to make sure hugh was taller so I measured that out too!
so when you’re drawing things like architecture instead of thinking of it as a big complex shape, break it down and think about the size and position of things – especially the edges – relative to each other, and you’ll find it much easier to draw.
It’s very time consuming, but if you’re patient you can draw anything no matter how complex :^)
Being in college right now, we’re constantly hammered over the head about plagiarism, plagiarism, plagiarism. And with good reason! Plagiarism is the deceitful practice of trading off someone’s work as your own and thus reaping the benefits from it.
I searched Google about the legalities behind tracing, the first result showed me this article by Kiffanie Stahle and it boils down to about three points according to Kiff:
“To decide a course of action, we’d talk through three things:
Is the source imagery protectable under the Copyright Act?
Did you copy the source imagery?
Did your copying rise to the level of an infringement?”
The article helps give further detail in breaking down these points to help you better understand, so if anyone else is in a similar position to you OR does trace and would like to know more about that, check out the rest of the article. It’s not too dense if you were expecting it to be some thick, legal jargon.
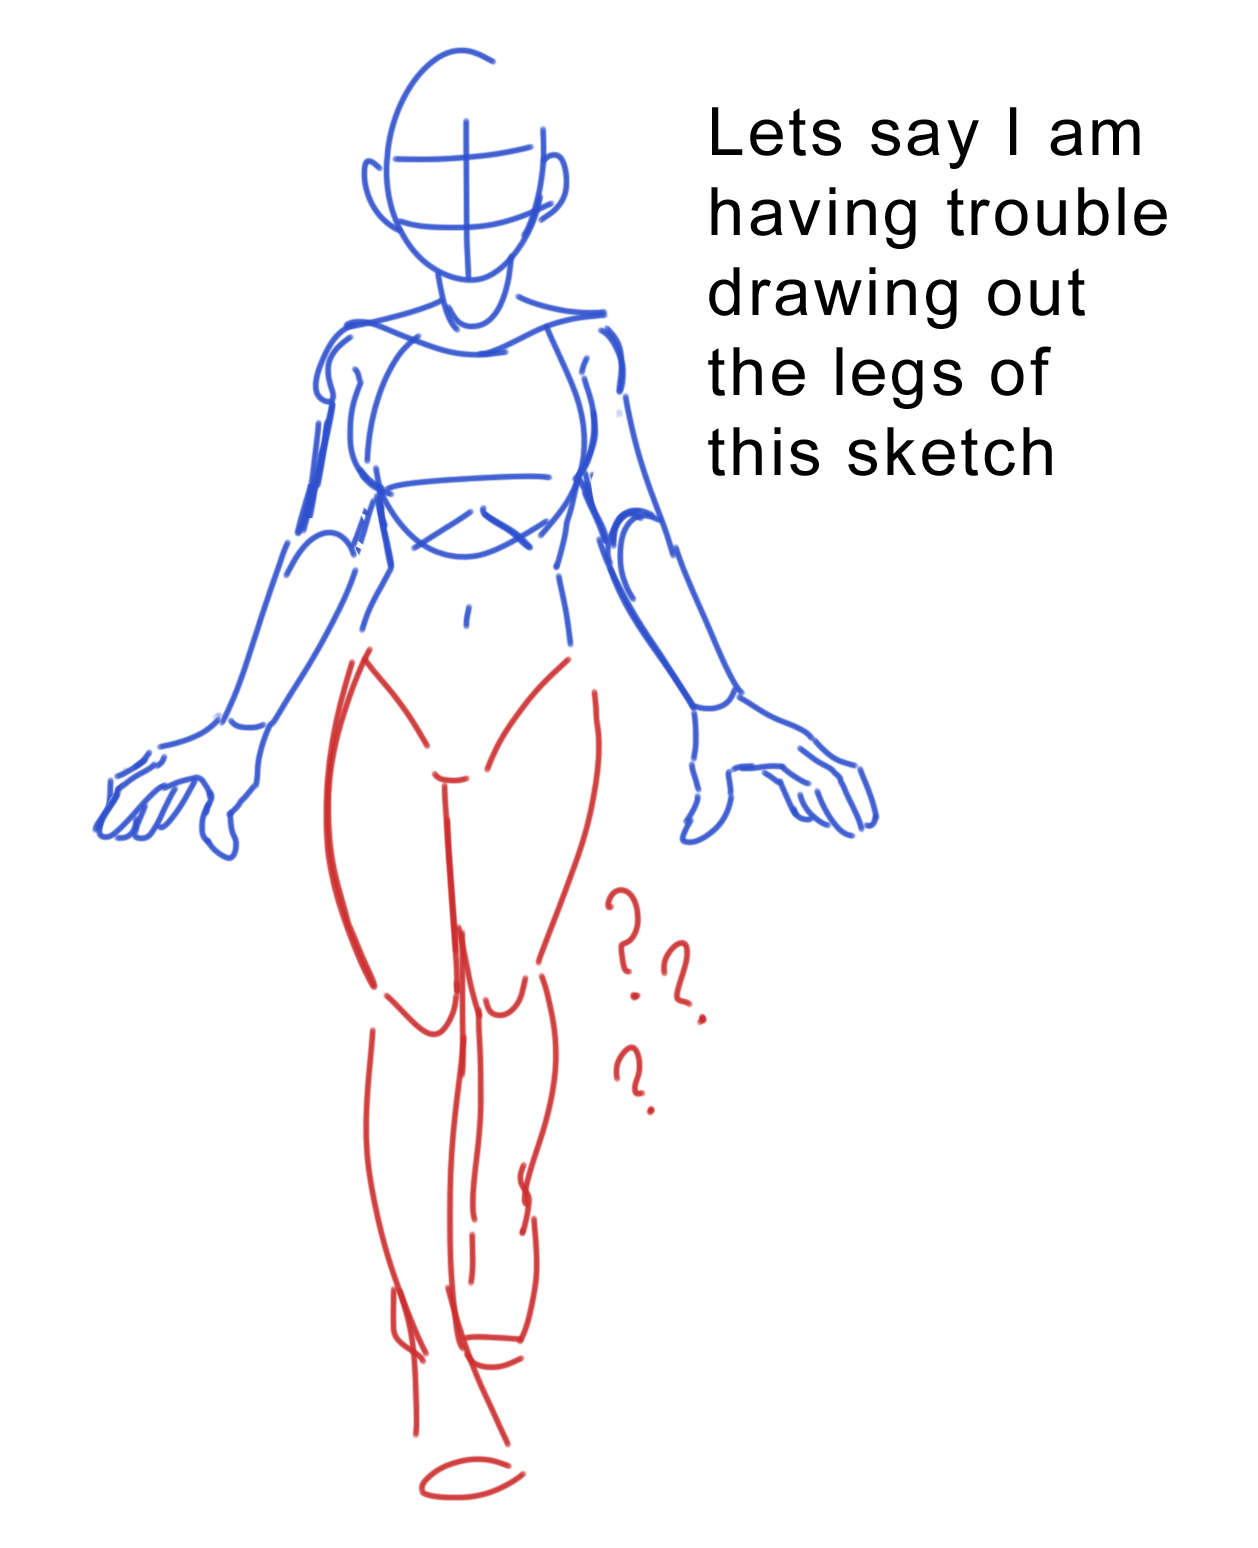
Coming back now to your specific situation though, here’s my personal hot take: it’s not plagiarizing. You said you already drew out the piece, and now you’re just having some trouble with the anatomy. So long as you’re not planning to redo the entire thing as one big tracing, I believe it would be safe to say you are allowed to correct your anatomy if you have a reference photo that can help.
Though before doing that!! I don’t know if this is the method you were planning to use, but I have a suggestion on how you can maybe go about this so that it A) is less direct tracing onto the picture and B) helps you to practice anatomy. I know it’s a bit tedious to do it this way, but I believe it will actually look more natural when implemented into your piece.
Have you seen this post before? Because it is an incredible practice that can help many folks who are just learning anatomy!
It is a very valid means of practicing and improving your anatomy. By trying to work backwards and break down the anatomy into more defined shapes that you can build from (I suggest using way more construction than I had so you can develop an even better understanding of the form) then you are gaining better knowledge of how to draw better!
In addition to this ask, there was another anonymous message received that I felt was similar to this one/was relevant to this ask too…
I think the answer to this lies within the three questions posed: “Is the source imagery protectable under the Copyright Act? Did you copy the source imagery? Did your copying rise to the level of an infringement?”
While I suggest to you to maybe perform the same method I demonstrated above (as yes, it can apply to gesture posing too!) I believe that you may want to just be careful of where the source comes from (to see what the copyright is on the images you are using),how much inspiration or tracing you plan to take away from the reference, and if you plan on merchandising the final product.
In celebration of our cozy online community, I present to you WHUMPTOBER – 31 Days of deliciously painful prompts for your creative pleasure. Visual art, writing, editing – post whatever inspires you!
Treat (or rather, torture) your whumpees to some tantalizing tropes and tag your work with “whumptober“ so others can enjoy your stuff!
(The challenge kicks off on October 1st, feel free to participate as much or as little as you like. DM me if you have Qs. This post will circulate my blog a few times as we near the end of September. Good Luck and Happy Whumping!)